Vectorization and Numpy
In this post I will discuss py5 performance tuning and the importance of vectorized operations.
Recently I saw this tweet by py5 supporter @villares:
Also #py5 @py5coding #Python3 #Processing
— Alexandre B A Villares☂🐍🧄 (@villares) August 31, 2021
I have to get used to -1 to 1 noise I suppose... :D
(check out Tristan's py5 + https://t.co/79JFm7tjvT tutorial: https://t.co/3mSb1wkG0V) pic.twitter.com/u4QH3zDM8Z
I am always happy to see these explorations of what can be done with py5.
In the code I noticed the use of nested for loops making calls to py5's noise function. It happens that earlier in the day I also had a conversation on the Processing Discourse about nested for loops and the py5 noise function. I wrote this blog post because I felt there was something that needed to be explained in more detail.
My concern was that the code would run slowly, or would not be as fast as it could be. I know that the noise function can accept numpy arrays as inputs and that using an array can provide a significant performance improvement over repeatedly calling the function multiple times in for loops.
As the creator of py5, I know that performance can sometimes be complicated because of the use of Python and Java together. It is necessary for me to educate people using py5 about how to write efficient code that leverages py5's strengths without getting caught up in the pitfalls caused by combining two languages.
Original Code
A copy of @villares's code is below. Note that this code is written in imported mode and I am running it using the py5 kernel, which is slightly different from the regular Python Notebook kernel. This kernel effectively executes a from py5 import * statement along with some other AST magic to make sure everything works correctly. If you are using the regular IPython kernel, you'll need to add an import py5 to the top and add a "py5." prefix to py5's methods, variables, and constants. Don't use py5 with a from py5 import * statement and the regular IPython kernel.
s = 0.003


def setup():
    size(500, 500, P3D)
    noise_seed(0)


def draw():
    background(0)
    translate(width / 2, height / 2)

    rotate_x(HALF_PI)
    rotate_z(QUARTER_PI)

    translate(-width / 2, -height / 2, 0)

    t = frame_count
    for x in range(10, 500, 20):
        for y in range(10, 500, 20):
            d = 200 * (1 + noise(x * s, y * s, t * s)) / 2
            my_box(x, y, -200 + d / 2, 10, 10, d)


def my_box(x, y, z, *args):
    push()
    translate(x, y, z)
    box(*args)
    pop()
I added noise_seed(0) because of a bug in the current version of py5. Until the next release, I ask you to do the same when using noise().
I also want to point out that py5 depends on the noise library, which has not had a release in over 6 years. There is no activity in the project's GitHub repo, suggesting that it is no longer maintained. Nevertheless, let's respect @caseman's contribution to open source, as it has spawned many forks and noise library alternatives.
In the near future (within a few months) py5 will likely change its noise functionality implementation to use a different library. Research into the matter is ongoing. Note that py5 is still alpha software, and although most of it is stable (because py5 depends on Processing, which is stable), I need the ability to make breaking changes where necessary. There won't be many, but if and when they do happen, I'll provide clear guidance as to what to do about it.
Now that that's out of the way, let's get back to the fun part and run the Sketch:
run_sketch()
The Sketch is running in a window on my monitor...but what does it look like? Let's provide a snapshot for folks who are reading this post and not running the code on their computer.
py5_tools.screenshot()

The Sketch displays a grid of white boxes on a black screen. But the Sketch itself is animated. Happily, py5 can also create an animated GIF using the running Sketch.
py5_tools.animated_gif('images/py5/vectorization_and_numpy/animation.gif', count=10, period=0.3, duration=0.3)
The animated GIF can then be included in the notebook's markdown.
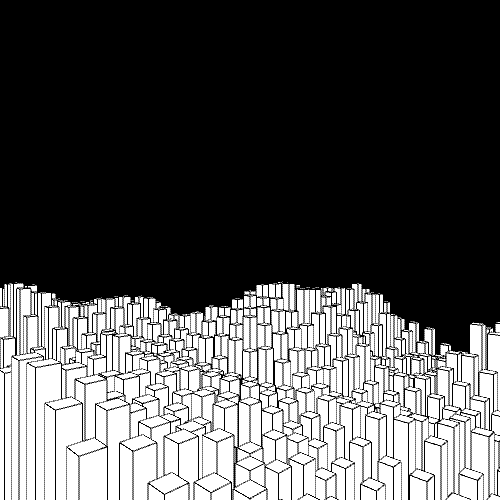
The boxes are randomly moving up and down based on the values provided by the noise function.
The animated GIF is not quite the same as the nice smooth animation I see on my computer, but it does provide a good visualization to communicate what the Sketch is about.
Now let's think about the code's efficiency. To start, let's find the Sketch's frame rate.
get_frame_rate()
The frame rate is good, but let's dig deeper anyway. We can use py5's built in line profiler to get line-by-line statistics on the draw() method's performance.
To do that, first we call profile_draw() to initiate the line profiler.
profile_draw()
After waiting a minute or so for it to collect statistics, we can call print_line_profiler_stats() to see the results. If need be we can call it multiple times to see the latest statistics as it continues to accumulate.
print_line_profiler_stats()
From the results it is clear that it spends most of its time on the two lines of code in the nested for loop. Execution of each of those lines takes a small number of microseconds (note the Timer unit: 1e-06 s at the top of the report), but those microseconds will add up because they are called hundreds of times. How many times do each of those lines of code get called for each iteration of the draw() method? We can calculate that by knowing the size of each layer of the nested loop:
loop_count = len(range(10, 500, 20)) * len(range(10, 500, 20))

loop_count
Combining that with the "Per Hit" numbers from the line profiler results, I see on my computer it works out to be around ~27 milliseconds.
loop_count * (16.9 + 25.8) / 1000
There is no clear dividing line between "fast" and "slow" code, but in this Sketch, this is where it spends most of its time. This is the code that will need to be modified somehow if you wanted to make the Sketch faster or add more content to the Sketch and maintain the same speed.
Vectorizing using Numpy
To address this, let's take a diversion and learn about vectorization. We'll start by importing the numpy library:
import numpy as np
The numpy library has a number of useful functions for creating grids of numbers. The most general tool is np.meshgrid, but we will use np.mgrid in this post.
ygrid, xgrid = np.mgrid[0:5, 0:3]
Let's examine both xgrid and ygrid to understand what this does:
xgrid
We have a 2D array with 5 rows and 3 columns. Note that that matches the sizes of the two parameters, 0:5 and 0:3. Also note that the numbers in each row match the values in the sequence 0:3.
Now let's look at ygrid:
ygrid
Another 2D array with the same size and shape. For this array, each column matches the values in the sequence 0:5.
Now why is this useful?
We can use both arrays as parameters to do what are effectively "group" calculations. More concretely, we can use it to get noise values for every pair of numbers in the two arrays at the same time:
noise_values = noise(xgrid, ygrid)

noise_values
Boom. But are those numbers the same as what we would get from nested for loops?
We can do a quick test to see:
for y in range(0, 5):
    for x in range(0, 3):
        noise_value = noise(x, y)
        print(x, y, noise_value)
        assert noise_values[y, x] == noise_value
They are! Therefore the nested for loops can be replaced with noise_values = noise(xgrid, ygrid).
Now let's create two similar grids to use in our Sketch. They can be created outside the Sketch because they are created by numpy and will be the same for every iteration of the draw() function.
ygrid, xgrid = np.mgrid[10:500:20, 10:500:20]
We can then replace all of the individual calls to the noise() function with a single line of code, without the need for any for loops:
d = 200 * (1 + noise(xgrid * s, ygrid * s, frame_count * s)) / 2That line of code is replacing all of this:
t = frame_count
for x in range(10, 500, 20):
    for y in range(10, 500, 20):
        d = 200 * (1 + noise(x * s, y * s, t * s)) / 2
But wait...what about the calls to my_box()? Those were in the for loop also. What can we do about them?
The my_box() function is not able to handle 2D array inputs. Inside the my_box() function, we see calls to several of py5's methods, none of which can handle 2D array inputs. What can we do?
Happily, numpy provides a useful tool for us to use in this situation: np.vectorize(). Give it any function and it will provide you a new, vectorized version of the same function. It works like this:
vectorized_my_box = np.vectorize(my_box)That's it. In this case it won't provide a big performance improvement, but it will at least wrap my_box() with some magic that will manage looping through the multi-dimensional arrays in an efficient fashion.
Vectorized Code
Now let's look at the new version of the code. The setup() function is the same as before and does not need to be re-entered, but I am including it anyway so you can see the complete code together in one notebook cell.
s = 0.003
ygrid, xgrid = np.mgrid[10:500:20, 10:500:20]


def setup():
    size(500, 500, P3D)
    noise_seed(0)


def draw():
    background(0)
    translate(width / 2, height / 2)

    rotate_x(HALF_PI)
    rotate_z(QUARTER_PI)

    translate(-width / 2, -height / 2, 0)
    d = 200 * (1 + noise(xgrid * s, ygrid * s, frame_count * s)) / 2
    vectorized_my_box(xgrid, ygrid, -200 + d / 2, 10, 10, d)


def my_box(x, y, z, *args):
    push()
    translate(x, y, z)
    box(*args)
    pop()

vectorized_my_box = np.vectorize(my_box)
After exiting the Sketch we started earlier, we can now run the new version of the Sketch:
run_sketch()
Is there a difference? Let's look at the new profile statistics.
profile_draw()
Wait for a bit, then retrieve the results:
print_line_profiler_stats()
It is still spending most of its time calculating noise values and drawing boxes, except this time the total time spent on those two activities is about ~16 ms. This is an improvement of about ~11 ms, with most of the improvement coming from the new way of using noise(). Is this a dramatic change? No, it isn't, but if there were more boxes, the difference would be much larger.
But more important than the time difference, we learned something about vectorizing that can be applied to future Python projects to make them work a little bit faster. And that's what this post is about.
A Final Note...
Before concluding this post, there are two things I want to point out.
First, numpy's grid tools like meshgrid() and mgrid[] are quite powerful but take effort to use correctly. It can be tricky to figure out the right way to order the parameters to get the correct results, with the correct array shapes and the correct numbers in them. This is especially true when using arrays with 3 or more dimensions. When I use these tools I always start by testing with a few small arrays, as I did earlier in this blog post, and verifying that I have everything organized properly before moving on to the full-sized arrays that I intend to use in my program. It is absolutely worth it to triple check that everything is done correctly. Vectorized arrays can be challenging to reason about, so take your time with it.
Also note that other libraries like pytorch have similar grid functions but they don't behave exactly the same way in every situation. That's another reason to triple check your work when using them.
And second, I do want to emphasize the importance of making an effort to performance tune your code. In the short term it may seem like a waste to spend time on something like this because the new code has the same exact output as the original code. The reason why it matters is because going through this process will teach you new things about Python that you will be able to apply to future projects. The scale and scope of your projects will also be able to grow larger because your code will be able to run faster. Trust me, this matters. Put in the time today and it will pay dividends in the future.
Comments