Monoscopic 360 Video Best Practices
Below is the information you need to generate 360 Videos for Facebook, YouTube and Vimeo. 360 Videos created in Processing are similar to 360 Videos created with popular 360 cameras except that there is no stitching or appearance of seams.
Sketch Workflow
Development
Here is the Camera3D code I use when developing a new 360 video sketch.
void setup() {
  size(800, 400, P3D);

  camera3D = new Camera3D(this);
  camera3D.renderMonoscopic360();

  camera3D.setBackgroundColor(color(255));
  camera3D.camera(0, 0, 0, 0, 0, -1, 0, 1, 0);
}
Notes:
The equirectangular projection will be visible in the sketch window. It's obviously distorted but with experience you can understand what's going on and program your sketch accordingly.
Camera3D needs to know the sketch's background color.
The first three parameters to the
cameramethod specify the coordinates for the camera location. Moving the camera to the origin simplifies sketch design.The second three parameters to the
cameramethod specify the coordinates of the center of the scene and for this Generator that will appear in the center of the equirectangular projection. In this sketch the center is pointing towards the negative z-axis. The magnitude of the vector going from the first set of coordinates to the second is not important.
Testing
When I am ready to test a sketch with an online 360 player, I change it to this:
void setup() {
  size(1300, 900, P3D);

  camera3D = new Camera3D(this);
  camera3D.renderMonoscopic360()
    .setOutputSizeAndLocation(4096, "frames/sketch_#####.tiff")
    .skipDisplayingCompositeFrame();
  camera3D.setFrameLimit(30 * 60);

  camera3D.setBackgroundColor(color(255));
  camera3D.camera(0, 0, 0, 0, 0, -1, 0, 1, 0);
  camera3D.reportStats();
}
Notes:
-
The size of the sketch window increased to improve the output quality.
My monitor is HD with 1920x1080 pixels and for whatever reason Processing will crash if the sketch window doesn't fit on the screen, so I must make the height a bit smaller than I would like. Note that the aspect ratio of the sketch size is irrelevant when the Generator is saving output to files.
For 4K video there's no benefit in making the height or width greater than 1300 pixels. I would test with 1300x1300 if I could, or maybe use something a bit smaller to speed up execution.
-
The output size is 4K, indicating the width of each saved frame. The height will be half of that as the aspect ratio of the saved equirectangular images is by default 2x1.
The files are saved to a subdirectory in *.tiff format. Any image format Processing supports is fine, but note that *.tiff files are the fastest to save and take up the most space. Each 4K *.tiff file will be 24 MB in size; 8K will be 96 MB. This will quickly hose your hard drive if you are not careful.
To protect users from tragedy, Camera3D now supports a frame limit. This will cause the sketch to exit after the specified number of frames. When the frame limit is used this Generator will check your available hard drive space and will refuse to proceed if enough space is not available.
To improve performance, I skip displaying the composite frame to the sketch window. The sketch window will be black and the frame rate will be higher. I can observe progress by viewing the reported stats.
Final Product
To produce a final, high quality resolution 360 video, I use this:
void setup() {
  size(1300, 650, P3D);

  camera3D = new Camera3D(this);
  camera3D.renderMonoscopic360()
    .setPanelXYSteps(1, 2)
    .setOutputSizeAndLocation(4096, "frames/sketch_#####.tiff")
    .skipDisplayingCompositeFrame();
  camera3D.setFrameLimit(30 * 60);

  camera3D.setBackgroundColor(color(255));
  camera3D.camera(0, 0, 0, 0, 0, -1, 0, 1, 0);
  camera3D.reportStats();
}
Notes:
Sketch height is now half the optimal value of 1300.
The call to
setPanelXYSteps(1, 2)will double up the panels used for each camera orientation, resulting in identical output to a sketch with size 1300x1300. This will double the number of calls to thedraw()method and will therefore be slower but will result in optimal resolution.
Uploading Content
Videos
The Processing Development Environment comes with a Movie Maker tool (Tools => Movie Maker) that you can use to create movie files. This tool can be used to assemble the saved frames into a movie file. I prefer to use the command line so I have more control over the output. The specific command I use is:
The next step is to add meta-data to movie file. This step is required for Facebook and YouTube to recognize the video is a 360 video. The meta-data is helpful for Vimeo but there is a 360 video checkbox in the Video Settings controls if you prefer.
There are utilities available for adding this metadata. Google provides one for Windows and Mac, available on github. As I am a Linux user and Python aficionado I use the Python script:
Upload your video just like you would any other video file. With the meta-data it will be recognized as a 360 video file and will be processed accordingly. You will have to wait a bit for the video processing to complete. While you are waiting, write a helpful description that credits Processing and Camera3D for your video.
There are other meta-data tools available, such as one offered by RICOH, a manufacturer of a popular 360 camera.
Pictures
To upload a single frame to Facebook, first convert the image format to *.jpg. Then use exiftool to add the appropriate metadata. Either of the below commands will work:
Audio
Spatial Audio for 360 videos is a feature supported by Facebook, YouTube, and will soon be supported by Vimeo. I have not yet begun to explore this so I can't speak to that. If you do something cool with this, please let me know.
Customizing 360 Video
Your situation may be different and you may want to use different customizations for this Generator. Below is the information you will need to do that.
Generator Methods
There are other Generator functions available that you may find helpful. Check the Javadocs for more detailed information.
setPanelExplainPlanLocation
The brightly colored images used to show how the Generator panels work found in this tutorial are called explain plans. These explain plans were valuable diagnostic aids when I was developing this tool. It can also be used by you to understand the arrangement of the panels used by the Generator as it renders your sketch.
...
camera3D.renderMonoscopic360()
  .setPanelExplainPlanLocation("frames/explain-plan.png")
  .setOutputSizeLocation(4096, "frames/sketch_#####.tiff");
...
The explain plan will look like this:
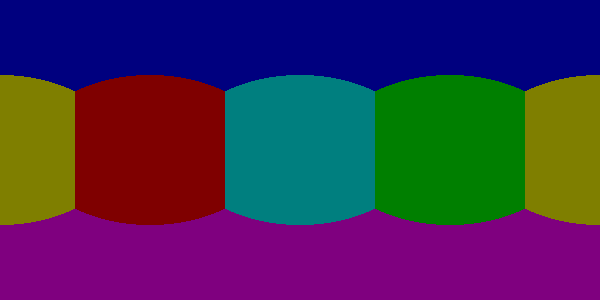
The area of the panels covering the poles are each 26.7% of the total projection area. The other four panels are 11.6% each.
setOutputWidthHeightAndLocation
If you don't want the output to span the full 360 degrees of rotational range you can replace setOutputSizeAndLocation with setOutputWidthHeightAndLocation. When the width:height ratio is less than 2:1 this will limit the side-to-side range of the output. When the ratio is greater than 2:1, this will shrink the output, starting from the poles. This will be useful for some platforms that allow for this but may require additional meta-data.
For example, reducing the projection height like this:
...
camera3D.renderMonoscopic360()
  .setPanelExplainPlanLocation("frames/explain-plan.png")
  .setOutputWidthHeightAndLocation(4096, 1024, "frames/sketch_#####.tiff");
...
Will result in this panel explain plan:
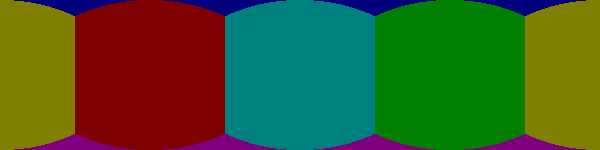
The region near the poles is gone.
And reducing the projection width with these settings:
...
camera3D.renderMonoscopic360()
  .setPanelExplainPlanLocation("frames/explain-plan.png")
  .setOutputWidthHeightAndLocation(2048, 2048, "frames/sketch_#####.tiff");
...
Will result in this panel explain plan:
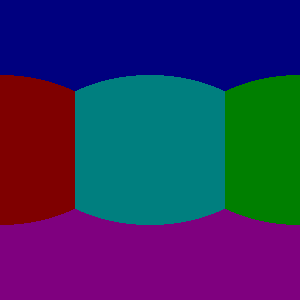
Any panels that aren't found in the explain plan will be discarded, resulting in less calls to the draw() method and improving performance.
setNearFarLimits
Like all 3D renderings a bounding box is used to set limits for the vertices that are included in the rendered scene. This Generator makes clever use of the frustum function to efficiently render all possible viewing angles from the camera's location. That function has parameters for near and far. By default those are set to 1 and 1000. You can override those settings like this:
setThreadCount
Assembling each frame of the equirectangular projection requires a lot of pixel-by-pixel memory copying. The Monoscopic 360 Video generator will perform that copying in parallel. By default the number of threads used is half the value returned by Runtime.getRuntime().availableProcessors(). You may get a performance improvement by adjusting this setting.
Resolution Settings
The maximum resolution of YouTube 360 videos is 8K. The maximum resolution for Vimeo and Facebook is 4K.
The optimal sketch size for a equirectangular projection is approximately equal to a third of the width of the resolution, or more precisely, the width divided by \(\pi\). This can be proven mathematically. For a 4K video, this is 1304 pixels. For 8K, this is 2608.
The setPanelXYSteps method can be used to increase the number of panels used to create the projection. This is useful for computers that cannot render an optimally sized square sketch. This feature will be useful when 360 video players start supporting much larger formats.
For optimal rendering the number of X steps times the sketch width and the number of Y steps times the sketch height must both be equal to the optimal sketch size. It's OK if one or both are a little bit off but too much of a shortfall will result in pixelated output.
For my 1920x1080 monitor, I would use this code:
void setup() {
  size(1300, 650, P3D);

  camera3D = new Camera3D(this);
  camera3D.renderMonoscopic360()
    .setPanelXYSteps(1, 2)
    .setOutputSizeAndLocation(4096, "frames/sketch_#####.tiff")
    .skipDisplayingCompositeFrame();
  camera3D.setFrameLimit(30 * 60);
The panel explain plan would look like this:
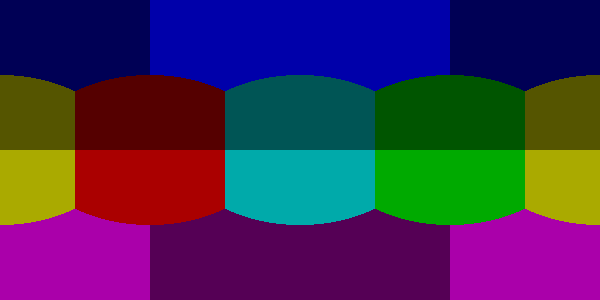
Observe that each panel appears to have been split vertically.
To create 8K video I would use this code:
void setup() {
  size(1300, 870, P3D);

  camera3D = new Camera3D(this);
  camera3D.renderMonoscopic360()
    .setPanelXYSteps(2, 3)
    .setOutputSizeAndLocation(8196, "frames/sketch_#####.tiff")
    .skipDisplayingCompositeFrame();
  camera3D.setFrameLimit(30 * 60);
The panel explain plan would look like this:

Each original panel has been split into 6 smaller panels, resulting in 36 panels. Execution will be slow but the resolution quality will amazing.
When the panels are subdivided like that it is important to understand that the camera orientation stays the same. The camera will only point in one of six directions. The frustum function is used to create skewed clipping planes to render smaller portions of the sketch. This works because there's no rule that says the frustum must include the region directly in front of the camera.
For any configuration of sketch sizes and panel arrangements you can study the resolution performance using the utility sketch Monoscopic360ResolutionTest found in the example code.
Helpful Links
Presentations
I put together a presentation on 360 Video with Camera3D for ITP Camp. The code used in the presentation is available on online.
Future Development
Stereoscopic 360 Video, of course! Stay tuned...