Posts about 3d printing

Stratasys 3D Printing

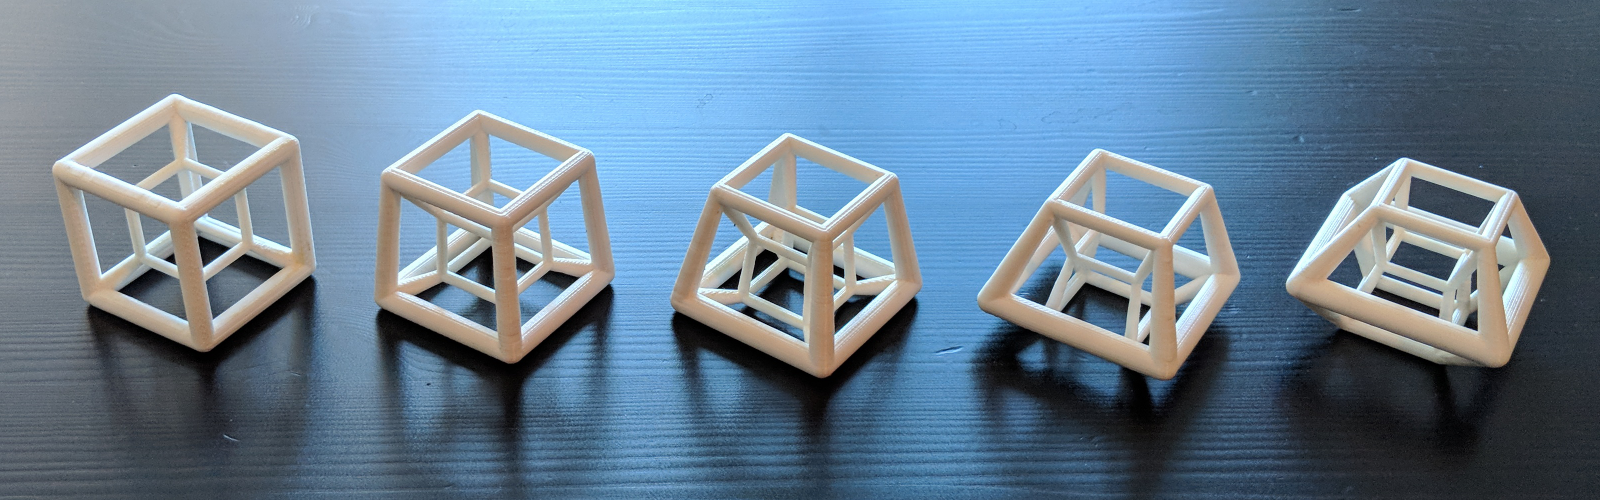
The 3D prints for my final Tesseracts project were done on the Ultimaker 2+ printers available at the NYU Makerspace. The print quality was good but the Makerspace also has professional 3D printers that can print at much higher resolutions. After our 3D printing class was over, I printed my tesseract models on a Stratasys Dimension Elite printer. Not only was the print quality excellent, but the print process was reliable and stress-free.

series of five printed hypercubes in a row, sitting on a wooden table.

Read more…

Tesseracts

I am interested in using 3D printing to model and visualize mathematics. To explore this, I will analyze and study a tesseract. A tesseract, or hypercube, is a 4 dimensional cube. It is analogous to a cube in our 3D world. Tesseracts are challenging for 3D beings to visualize and understand. They are theoretical structures that can be understood mathematically. Tesseracts can interact with a 3D world in a way that is similar to a cube interacting with a 2D world. A 2D being cannot understand, visualize, or fully experience a cube, but as a cube rotates around, they can gain a better understanding of what the structure is like. Similarly, a rotating tesseract can help us understand what they are like.

Using math and 3D printing, I can create multiple versions of a rotating tesseract. These 3D printed tesseracts can be assembled in a stop motion animation to show what the tesseract looks like as it rotates around 4D space.

Animation of 3D printed hypercube rotating in four dimensional space.

This project was inspired in part by the book Visualizing Mathematics with 3D Printing.

Read more…

Modeling a Tesseract

Consider a 3D printed cube. This cube will cast a different shadow onto a piece of paper when the light source moves around.

series of images showing the different shadows cast by a cube when a single light source is moved around.

Beings living in a 2D world will experience the cube differently depending on how the shadow is cast onto their world.

Similarly, a 4D cube, or Tesseract, can also cast a shadow onto our 3D world. It is challenging to think about this because we do not directly experience the world in 4 dimensions. Nevertheless, I was able to model a tesseract using Python and Rhino. Specifically, I modeled a 4D tesseract and its perspective projection onto 3D space. This model will change as the tesseract rotates in 4D space. The projections were modeled in Rhino using the RhinoCommon SDK.

Read more…

Improved Model and Final Project Ideas

Improved 3D Speaker Case

Previously I designed and printed a 3D speaker case to use in my Physical Computing class. The speaker case worked well but I made a design error in Rhino. The front opening for the speaker was smaller than I intended it to be. All I had to do is make the opening larger and print out a new one. Sounds simple right? How could this possibly go wrong?

The redesign in Rhino was straightforward:

model of speaker case with larger opening for speaker

Next, I proceed to the 3D printer. This time I used the Ultimaker 2+ printer with a 0.6mm nozzle. Previously I used the Ultimaker 2+ Extended printer with a 0.4mm nozzle. Since my model isn't particularly detailed I thought I could save myself some time printing with a 0.6mm nozzle printer and lower resolution settings.

Read more…

First 3D Print

My first (mostly) successful 3D print! It is a speaker case for a small speaker I upcycled from a Hallmark greeting card. I intend to use this for my Physical Computing class.

black 3D printed cube-shaped speaker case with small speaker inside

Here's how I made it! First, I measured the speaker dimensions with digital calipers and sketched my idea on paper.

Read more…

Things That Fit Together

This week we learned new tools for constructing 3D objects. Our assignment is to use what we learned to build something with two parts that fit together.

My idea for this assignment was to build a phillips-head screw. I had a real screw that I used to model my Rhino screw. I began by making careful observations of the screw with a magnifying glass because I wanted the threads, curvature, and proportions to be as realistic as possible. I used digital calipers to take measurements that I incorporated into my design sketch.

Crude drawing of a screw with measurements for width, length, and distance between threads. Also, real screw in the upper right corner.

It took a lot of experimentation to figure out how to do this. I settled on an approach using Rhino's Taper and Helix commands. After tapering a helix shaped line, I can then use that line with the Sweep1 command to make the threads. It is important to taper before adding the threads because the Taper command distorts the threads in an unrealistic way.

Read more…

Introduction to Rhino

For our first class, we were introduced to the Rhino modeling program. Our assignment was to build something that fits in a 3 inch cube using the commands we learned about in the lecture.

My goal was to make a standard rook chess piece. To begin, I created a new workspace with millimeter settings (as instructed by Xuedi) and turned on the grid snap. Using the Polyline command, I drew a rough outline of the contour. My intention was to later use the Revolve command.

Gray grid with green and red axis lines and crude outline of rook chess piece

Read more…

Introduction to 3D Printing

Introduction to 3D Printing, taught by Xuedi Chen.

Class blog posts: