Input and Output Experiments and Weekly Readings
Electronics Lab
Our assignment for this week was to create something using digital or analog inputs and outputs. The circuit I created will light up a 3-color LED with a new randomly selected color when a button is pressed.
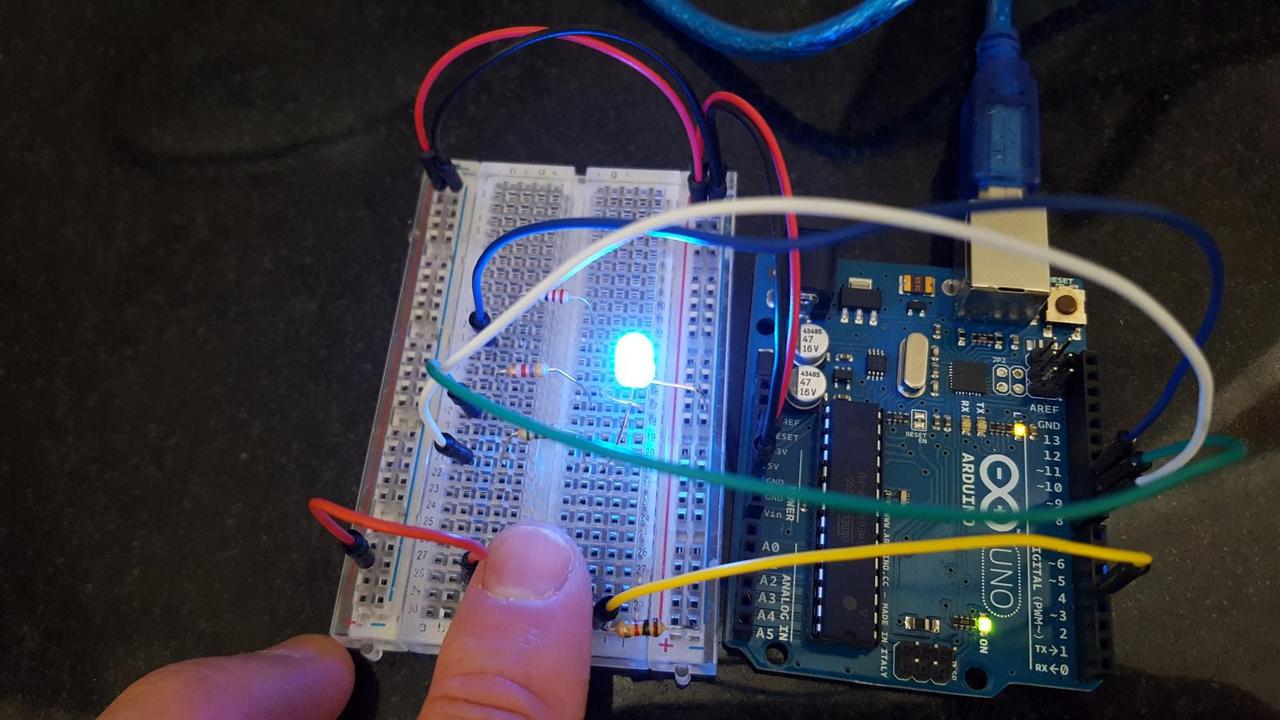
Here is a photo of the completed device:
And a schematic of the circuit:
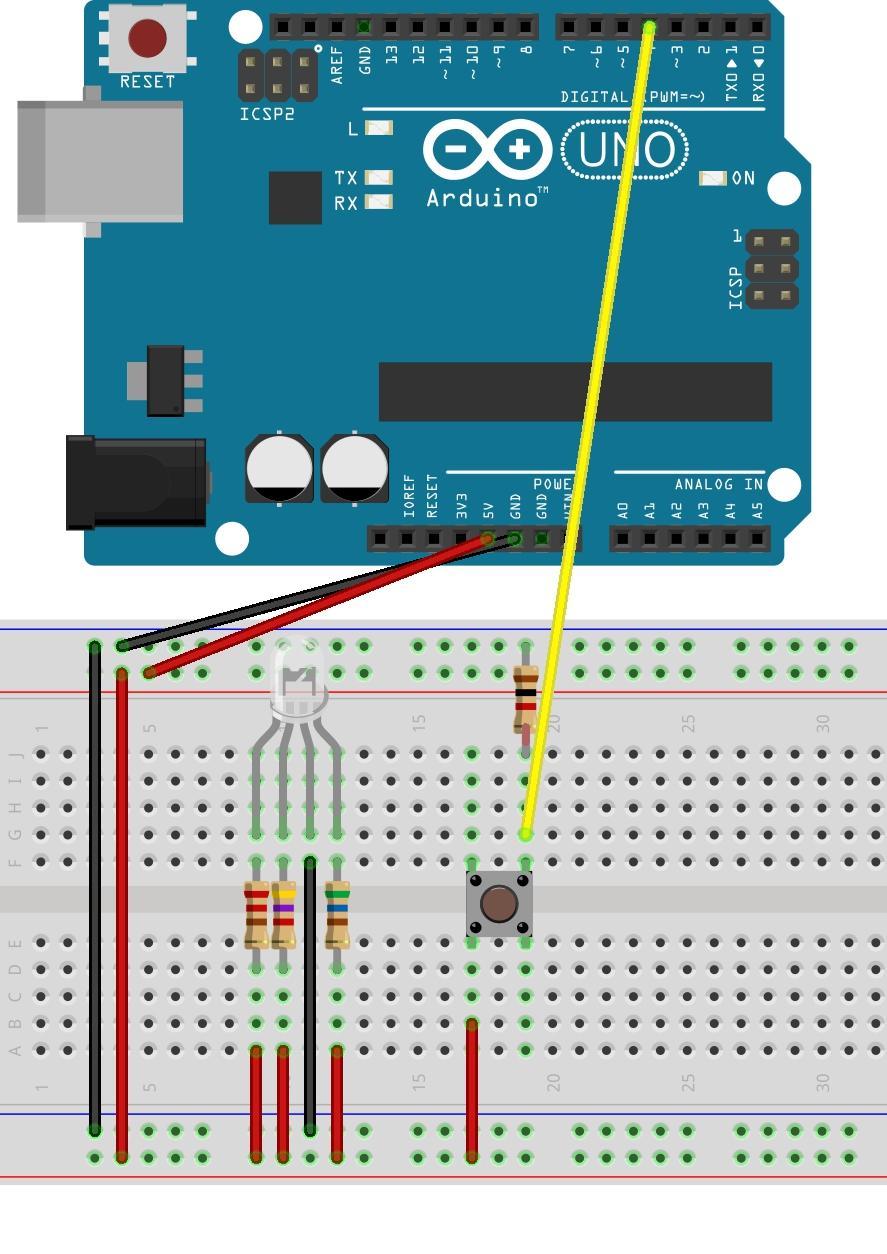
The Arduino uses digital input to detect when the button is pressed and released. It picks random RGB values and outputs analog values to light up the 3 color LED in that color. Observe I am using the 3 resistor values I calibrated for last week's assignment to make the LED's 3 colors balance out.
Here are my constants and variables. The buttonState variable is to keep track of the last state of the button, ie, pressed or released. Pressed equals true, released equals false.
const int BUTTON_PIN = 4;
const int RED_PIN = 8;
const int GREEN_PIN = 9;
const int BLUE_PIN = 10;

boolean buttonState;
Next, the setup code. I configure one pin to receive input from a button and three other pins to output the analog RGB values. I write to the RGB pins so the 3 color LED starts in the off state.
void setup() {
  // input button
  pinMode(BUTTON_PIN, INPUT);

  // output rgb channels
  pinMode(RED_PIN, OUTPUT);
  pinMode(GREEN_PIN, OUTPUT);
  pinMode(BLUE_PIN, OUTPUT);

  buttonState = false;

  // start with LED off
  analogWrite(RED_PIN, 0);
  analogWrite(GREEN_PIN, 0);
  analogWrite(BLUE_PIN, 0);
}
Then the interesting part. I wanted the LED color to change once when the button is released and not at any other time. To do this I must distinguish between when the button is in the off state after immediately after being pressed, and when it is in the off state after the button release has already been recognized and acted upon.
To make this work I used the buttonState value to keep track of the known state of the button. Using this variable I can keep track of when the button state changes.
Also note the use of the delay(10) function call. This makes sure that the button press and release are smooth. As the button is being pressed and released there can be short moments in time when the button circuit rapidly jumps between being connected and not connected. The delay makes sure that doesn't trip up the functioning of the circuit.
void loop() {
  if (!buttonState && buttonState != digitalRead(BUTTON_PIN)) {
    // button pressed
    buttonState = true;

    delay(10);
  } else if (buttonState && buttonState != digitalRead(BUTTON_PIN)) {
    // button released
    buttonState = false;

    // pick random color
    analogWrite(RED_PIN, random(255));
    analogWrite(GREEN_PIN, random(255));
    analogWrite(BLUE_PIN, random(255));

    delay(10);
  }
}
Questions
I had one frustration while completing this lab, and it is this error message:
avrdude: stk500_recv(): programmer is not responding
avrdude: stk500_recv(): programmer is not responding
avrdude: stk500_recv(): programmer is not responding
Again and again. Why?
Sometimes I could upload the Arduino sketch without a problem but more often than not I would get this error when uploading a program. I couldn't figure out why it would work one time and not another.
I was getting this error message while running the Arduino IDE from within the Linux virtual machine on my laptop. Since I prefer Linux I wanted to work in that environment but I eventually switched to Windows because it worked just fine there. This error message is not uncommon but none of the solutions I Googled resolved the issue. I have used Arduinos with Linux before and tested an Arduino shortly after setting up the virtual machine so I don't know why I am seeing this now.
I did learn some things about Arduinos while trying to diagnose this. This problem has to do with the bootloader on the device. Or my computer's ability to communicate with that bootloader. Since it works fine from Windows, there is nothing wrong with the Arduino. In any case, eventually I am going to learn more about the role of a bootloader in electronics boards like the Arduino.
Design Meets Disability
Graham Pullin is a designer who focuses on designing interactive objects for people with disabilities. He wrote a book titled Design meets Disability that explores the successes and failures of designing products for people with disabilities.
The biggest success in this area is the design of glasses for people with vision problems. Glasses as a product have been so successful that I didn’t even realize the significance of what has happened. A hundred years ago, glasses were considered “medical appliances” and were a source of social humiliation. Today, they are an important fashion accessory. People with no vision problems will even buy non-prescription glasses.
Compare this with the success of hearing aids. There is a social stigma associated with wearing or needing these. The design of hearing aids also does not have the rich expressiveness that the design of glasses has. Hearing aids are designed to be discrete or as invisible as possible, whereas glasses are designed to be noticed and make a fashion statement. Why can’t hearing aids be made the same way?
Pullin writes about what it is about glasses that worked so well so that we can apply the same lessons to hearing aids and other fields like prosthetics. One of the main lessons is to not design for invisibility. Also, fashion and creative designers need to be an integral part of the design process of these products. We should be designing products that are glamorous, improve human functionality, and are something people can be proud of. This is very different from the present state of affairs that values secrecy, hoping that people don’t notice that someone has a disability.
Observation of Interactive Technology
ATM machines are a critical interactive technology used by many people. What are our assumptions about how ATM machines are used? How do people actually use ATM machines? What are the easy or difficult parts of using these machines?
My main assumption about ATM machines is that they are primarily used to withdraw money from people's savings or checking accounts. I would expect people to take about 30 to 45 seconds to complete the transaction.
To investigate this, I spent some time in an ATM booth or standing outside. There are definitely unstated social rules about how long a person can linger in an ATM booth without actually using an ATM machine, and I definitely went over the acceptable limit. People want to use an ATM machine in a safe environment and somebody lingering in an ATM booth is suspicious behavior. Nobody said anything to me explicitly but eventually I retreated to outside the ATM booth and observed people using the machines from there.
One unexpected observation is witnessing someone depositing cash into the ATM machine. This was not a smooth interaction. The user had to insert a stack of bills into a slot that opened up to accept the bills. The bills were folded and wrinkled so they did not go into the slot willingly. The user had to fiddle with the bills to make that work. The process would have worked better if the user inserted the money into an envelope, but for whatever reason envelopes are no longer used for this purpose at ATMs like they were used in the past.
Nobody completed their ATM interaction in under a minute. Some took as long as 2 minutes. I was surprised. I thought people would be faster.
The process of withdrawing cash seemed to be easy for users to complete. Perhaps because users are well trained and know how to make a withdrawal without thinking about it or perhaps this aspect of the ATM interaction is well designed. Either way, this interaction is a good "conversation" between the ATM and the user.
Comments